
The dresser top might be the most misunderstood surface in the entire bedroom. In most homes it falls into one of two equally unsatisfying categories: completely bare and slightly sad, or completely buried under a graveyard of loose change, forgotten receipts, and last night’s jewelry. Neither version serves the room — or you. But a well-styled dresser top? That’s a different story entirely. It adds a layer of personality to the bedroom that art and bedding alone can’t provide. It makes the whole room feel considered. And the moment you crack the formula, it becomes one of the most satisfying surfaces in your home to style, refresh, and make your own.
The good news? There’s a formula — and once you learn it, you’ll use it forever.
Start Completely Fresh
Just like styling a credenza or a bookshelf, the first step to a beautifully styled dresser top is removing absolutely everything that’s currently on it. All of it. The half-empty perfume bottle, the orphaned earring, the phone charger, the stack of things you’ll “deal with later.”
A clean surface lets you see the dresser itself clearly — its size, its color, its proportions — and forces you to make active decisions about what deserves to live there instead of defaulting to whatever accumulated over time.
Once it’s clear, ask yourself one question before you put anything back: what feeling do I want this surface to create? Calm and minimal? Romantic and layered? Natural and organic? That answer becomes your editorial filter for every object that follows.
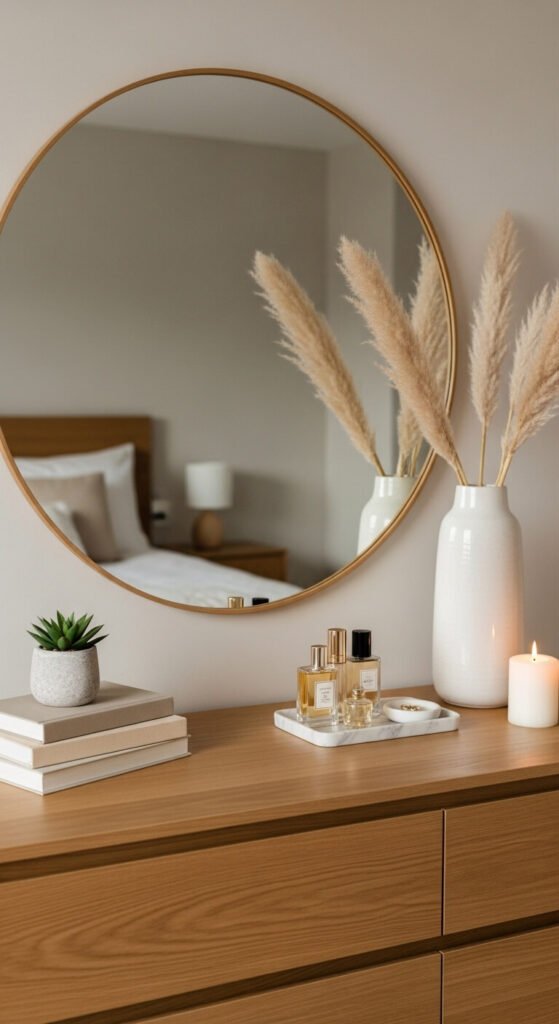
Anchor It With a Mirror or Artwork
The wall space above your dresser is just as important as the dresser top itself — and the two need to work together as a unified composition. Before placing a single object on the surface, decide what goes above it.
The best options for above the dresser:
- A large leaning mirror — leaned casually against the wall rather than hung; relaxed, proportionally generous, and endlessly practical for getting dressed
- A hung round or arched mirror — creates a soft focal point that works in every bedroom style from traditional to contemporary
- A single oversized art print — one large piece feels more intentional and sophisticated than several small ones competing for attention
- A gallery wall — works beautifully above a wider dresser; keep frames in a consistent finish for cohesion
Whatever you choose, it should be wide enough to feel connected to the dresser beneath it — roughly two-thirds the width of the dresser as a general guide. A tiny mirror above a wide dresser is one of the most common bedroom styling mistakes, and it makes both pieces look smaller than they are.
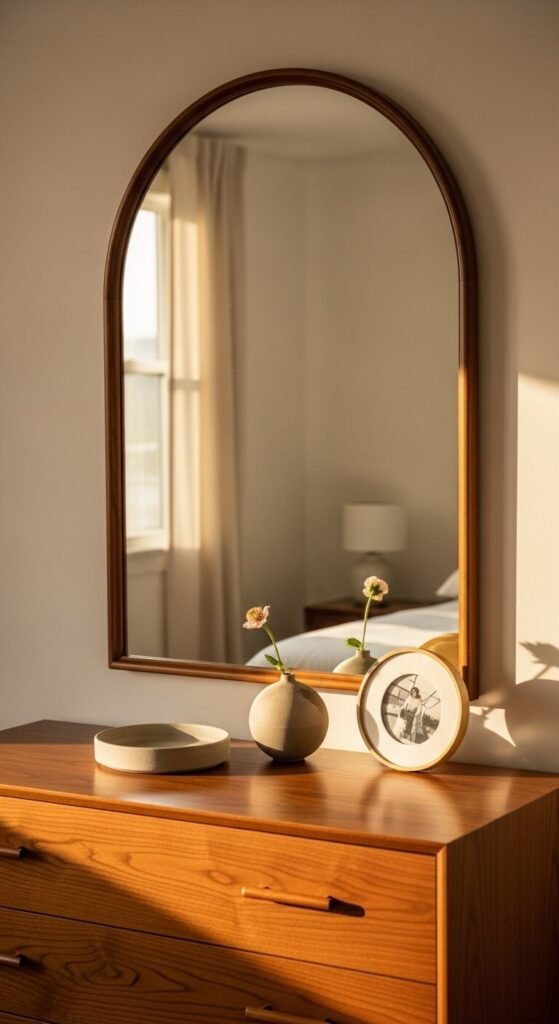
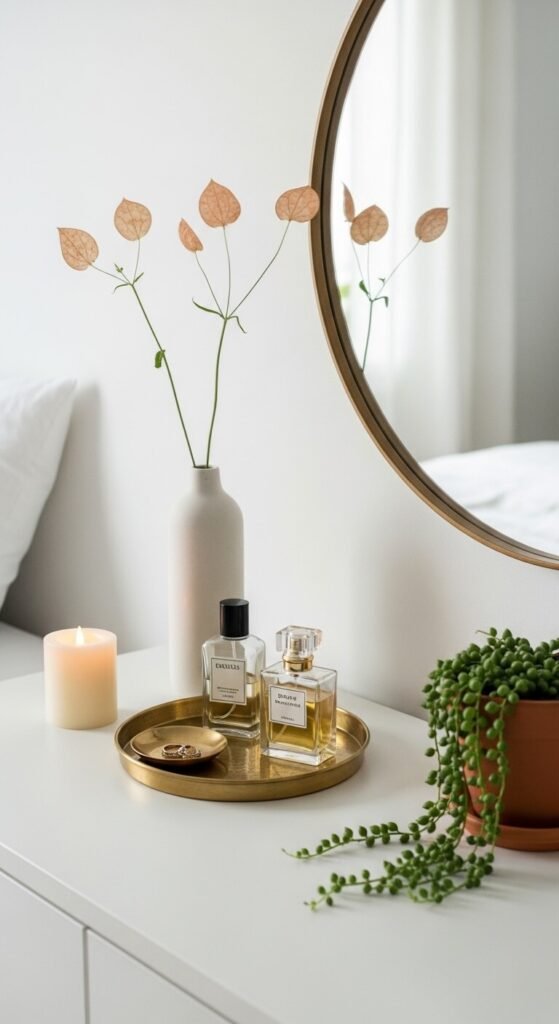
Build Your Layers Using the Height Variation Rule
Here’s the core principle that separates a styled dresser from a cluttered one: vary your heights deliberately. When every object sits at roughly the same level, the arrangement looks flat and uninspired. When heights move up and down across the surface, the eye travels and the composition feels alive.
Think of it as three tiers:
- Tall objects — a vase with stems, a table lamp, a tall candle, a framed photo; these anchor the back of the arrangement and create visual height
- Medium objects — a small plant, a perfume bottle, a small sculpture, a stack of books; these bridge the gap between tall and low
- Low objects — a tray, a ring dish, a small candle, a single stone; these sit close to the surface and ground the arrangement
Place taller items toward the back or sides and let the arrangement step down toward the front. This creates a sense of depth that makes the dresser top look layered and considered from across the room.
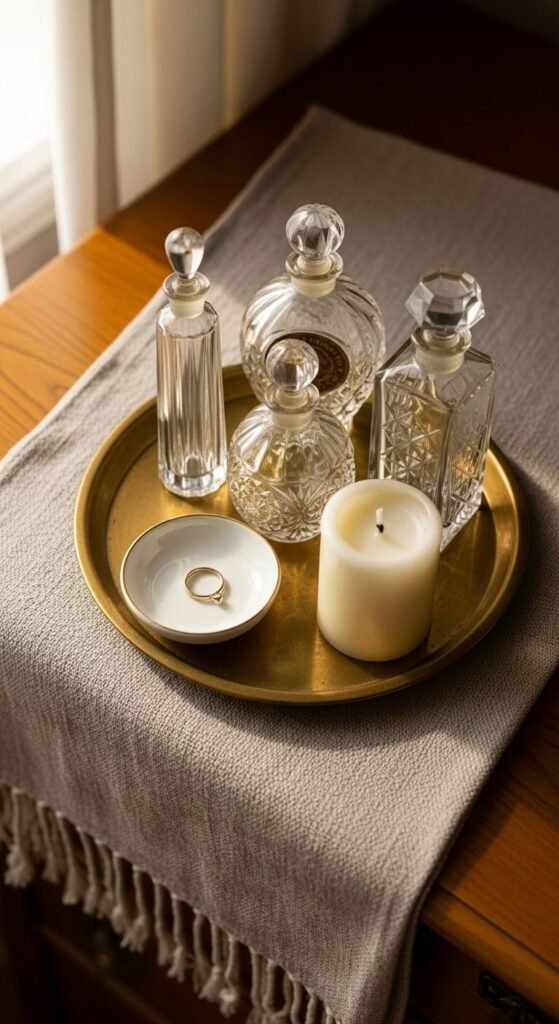
Use a Tray to Anchor and Organize
A tray is the single most useful styling tool on any flat surface — and it’s especially powerful on a dresser top. It does several things simultaneously: it corrals smaller items so they look intentional rather than scattered, it creates a visual boundary that gives the arrangement structure, and it adds another material and texture to the composition.
Tray styles that work beautifully:
- A lacquered rectangular tray in black, white, or a deep jewel tone for a polished, sophisticated look
- A hammered brass or gold tray for warmth and vintage elegance
- A woven rattan or seagrass tray for natural, organic texture
- A marble or stone tray for a luxurious, weighty quality that anchors the composition
What goes inside the tray:
- Perfume bottles grouped by height
- A small ring dish or jewelry holder
- A short candle or tea light
- One or two small personal objects — a keepsake, a small sculpture
Keep the tray curated. Three to five objects inside it at most — the tray’s purpose is to organize, not to hold everything.
Add Life With a Plant or Natural Element
A dresser top styled entirely with inanimate objects — however beautiful — will always feel slightly static. One living or natural element changes everything. It brings an organic quality that no ceramic or crystal object can replicate and makes the whole arrangement feel genuinely inhabited.
Best natural elements for a dresser top:
- A small potted plant — a succulent, a mini monstera, or a small snake plant; low-maintenance and sculptural
- A trailing plant in a small pot set slightly back so it drapes gently forward over the edge
- Dried stems in a slim vase — dried lunaria, bunny tail grass, or a single dried rose; no watering required, endlessly beautiful
- Fresh flowers — a small bunch of seasonal blooms in a simple bud vase; change them weekly and the dresser top always feels fresh and alive
- A sprig of eucalyptus tucked into an existing arrangement for fragrance and color
Place the plant in your tallest zone or let it trail in your medium zone — either way, it provides the visual softness that every dresser top needs.
Edit Until It Feels Right — Then Remove One More Thing
Once your arrangement is built, step back and look at it from the doorway — the same distance a guest would see it from. This is the moment most people add more things. Instead, try removing one.
A dresser top that has breathing room between objects looks styled. One that’s filled edge to edge looks cluttered — even if every individual piece is beautiful. Negative space isn’t emptiness; it’s the visual rest that makes each object more visible and more appreciated.
Final edit checklist:
- Do the heights vary across the arrangement?
- Is there at least one natural or living element?
- Are there at least three different materials or textures represented?
- Is there a tray or anchor point that creates structure?
- Can you see the dresser surface itself in at least a few places?
If the answer to all five is yes — you’re done.
Your Dresser Top Deserves the Same Attention as the Rest of Your Room
The bedroom is a sanctuary — and every surface in it contributes to how the room feels when you walk in. A styled dresser top signals that the whole space is cared for, considered, and completely yours. With a mirror above, varied heights across, a tray for structure, a plant for life, and the discipline to edit rather than accumulate, you have everything you need.
Save this guide for your next bedroom refresh, share it with someone whose dresser top has become a drop zone, and go build a surface that finally makes you smile every morning. 🪞✨