
Wallpaper has had its full, glorious comeback — and honestly, it’s not hard to see why. One wall, one pattern, and suddenly your entire room has a personality it never had before. But here’s where most people freeze: actually hanging it. The fear of bubbles, crooked seams, and expensive mistakes keeps so many people from ever trying. The truth? With the right prep, the right tools, and a little patience, hanging wallpaper is absolutely something you can do yourself — and do beautifully.
Choose the Right Wallpaper for a First-Timer
Not all wallpaper is created equal — and as a beginner, your choice of material will make or break the experience before you even unroll the first strip.
- Peel-and-stick wallpaper is the most beginner-friendly option. It’s repositionable, requires no paste, and peels off cleanly. Perfect for renters and first-timers.
- Pre-pasted wallpaper comes with adhesive already on the back — just wet it and apply. A solid middle-ground option.
- Traditional paste-the-wall wallpaper gives the most professional, long-lasting finish but requires slightly more skill and patience.
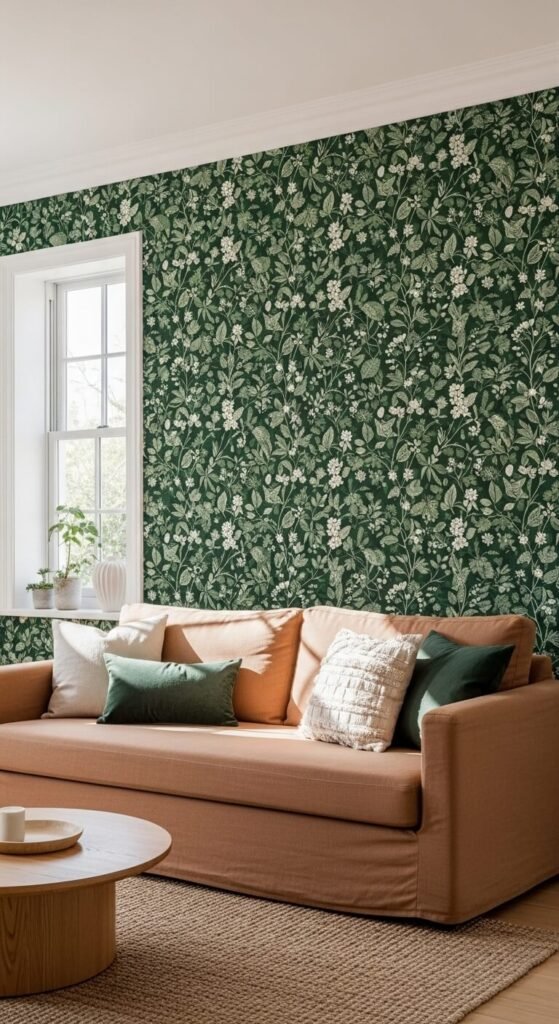
For your very first project, start with an accent wall rather than a full room. One wall builds confidence, limits the damage if something goes wrong, and still creates a dramatic transformation.
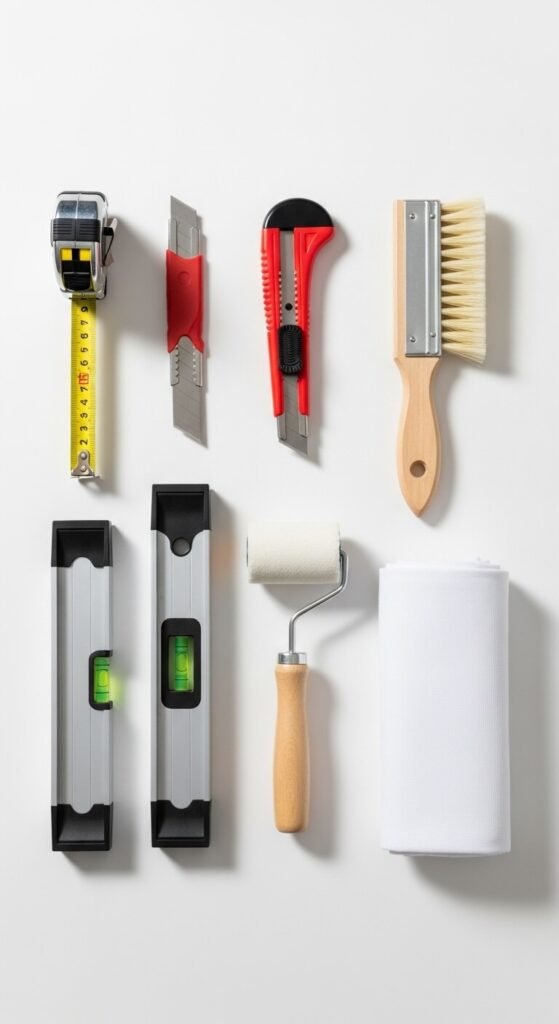
Gather Your Tools Before You Start
Walking away mid-project to find scissors is how mistakes happen. Get everything ready before the first strip goes up.
You’ll need:
- A tape measure and pencil
- A level (this is non-negotiable — more on that shortly)
- Wallpaper paste or a water tray (depending on your wallpaper type)
- A smoothing brush or plastic smoother
- A sharp utility knife and extra blades
- A seam roller
- A clean sponge and bucket of water
- A drop cloth to protect your floors
Sharp blades are everything in wallpapering. A dull blade drags and tears — swap in a fresh blade more often than you think you need to.
Prep Your Walls (Don’t Skip This Step)
The number one reason wallpaper fails — peeling, bubbling, refusing to stick — is poor wall preparation. This step is not glamorous, but it is everything.
- Fill any holes or cracks with spackle and let it dry completely. Sand smooth.
- Clean the walls thoroughly with a damp cloth to remove dust, grease, and residue. Let them dry fully.
- Apply a wallpaper primer (also called a sizing coat) if you’re using traditional wallpaper. This seals the wall, prevents moisture absorption, and makes the paper much easier to slide into position.
- Make sure the room is at a stable temperature — extreme cold or heat affects how adhesive performs.
A smooth, clean, primed wall is the difference between wallpaper that lasts for years and wallpaper that starts peeling by next spring.
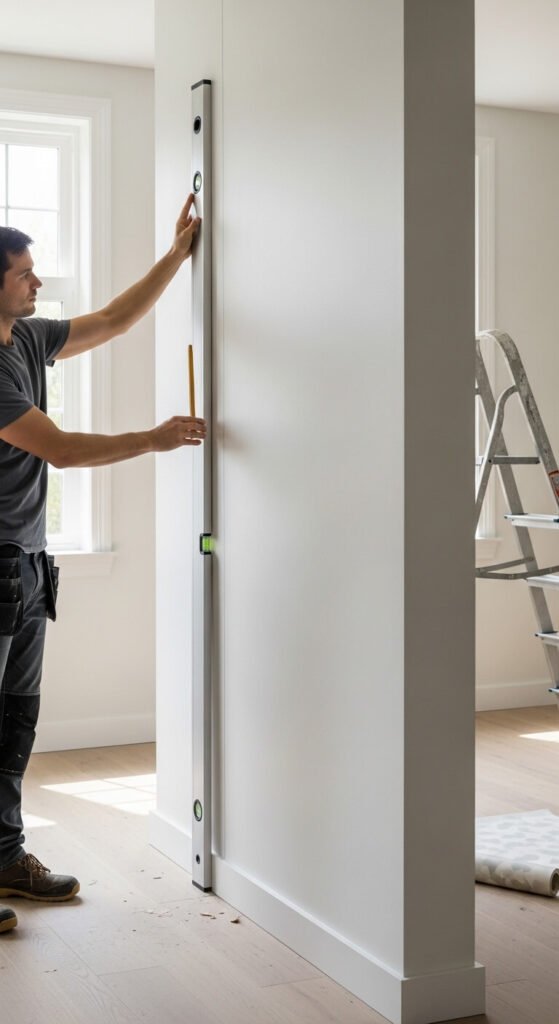
Find Your Vertical — And Trust the Level
Walls and corners are almost never perfectly straight. If you start your first strip by aligning it to a corner or door frame, you’ll be chasing a crooked line all the way across the wall.
Here’s what to do instead:
- Measure the width of your wallpaper roll, then mark that distance from your chosen starting point on the wall.
- Use your level to draw a perfectly vertical plumb line — this is your guide for the first strip.
- Hang your first strip against that line, not against the wall’s edge.
Every subsequent strip aligns to the previous one. Get the first strip right, and everything else follows.
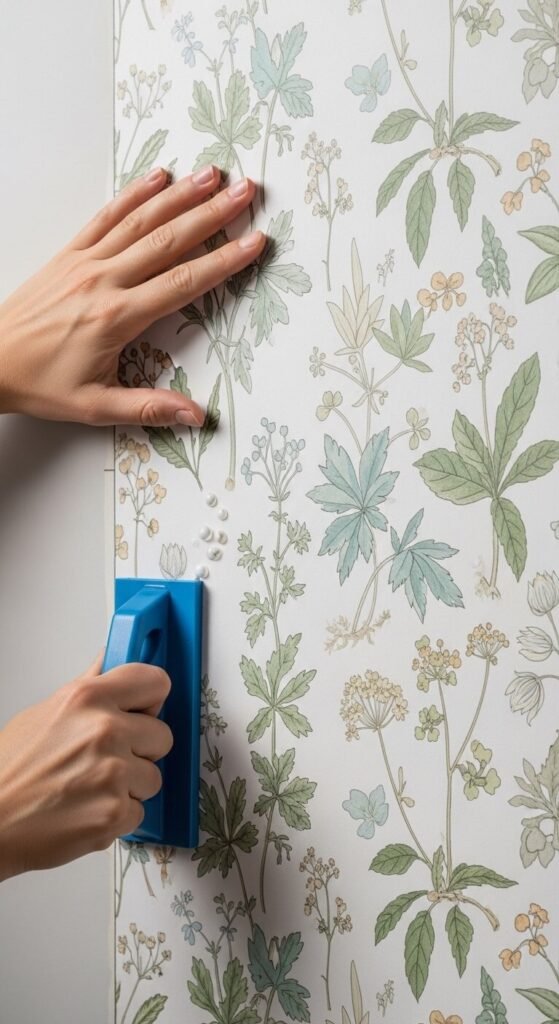
Hang, Smooth, and Trim Like a Pro
Now comes the satisfying part. Here’s how to apply each strip cleanly:
- Measure and cut each strip with at least 2–3 inches of extra length at both the top and bottom for trimming.
- Apply paste to the wall (or activate your pre-pasted paper) and position the strip against your plumb line.
- Starting from the top, use your smoothing brush or plastic smoother to work the paper flat — always moving from the center outward to push out air bubbles.
- Use a damp sponge to immediately wipe away any paste that squeezes out at the seams. Dried paste is much harder to remove.
- Once the strip is fully smoothed, use your utility knife against a straight edge to trim cleanly at the ceiling, baseboard, and corners.
- Roll each seam lightly with your seam roller for a flat, invisible join.
Take your time with the first two strips. Once you’ve got the rhythm, the rest moves quickly.
Handle Tricky Spots Without Panic
Corners, outlets, and windows trip up beginners — but they’re manageable with a calm approach.
- Inside corners: Hang your strip to overlap into the corner by half an inch. Then start the next wall fresh with a new plumb line.
- Outside corners: Wrap the paper around the corner by at least one inch, then overlap the next strip from the new plumb line.
- Outlets and switches: Turn off the power first. Hang the strip over the outlet, then carefully cut an X over the opening and trim the flaps back neatly.
When in doubt, go slowly and make small cuts rather than one large aggressive trim. You can always take more off — you can’t put it back.
The Takeaway
Hanging wallpaper as a beginner isn’t about being fearless — it’s about being prepared. Choose the right wallpaper, prep your walls properly, trust your level, and take it one strip at a time. The result is a room transformation that looks like it cost twice what it did and took three times the skill it actually required.
Save this guide for your next weekend project — that accent wall is waiting, and you are more ready than you think. 🎨