
Forget everything you thought you knew about wall art. Some of the most beautiful, conversation-starting displays in the most stylish homes aren’t framed prints or canvas paintings — they’re plates. Yes, plates. Hung directly on the wall in artful arrangements, a plate display brings color, texture, pattern, and personality to any room in a way that feels both collected and completely intentional. The best part? You probably already own half of what you need to get started.

Choose Your Plates With Intention
Not every plate is wall-worthy — and that’s actually a good thing. The selection process is where your display starts to take shape. You’re looking for pieces that share something in common while still having enough variety to keep things visually interesting.
Here’s what to look for when curating your collection:
- A unifying thread — this could be a consistent color palette, a recurring pattern style (florals, geometric, blue and white), a material (ceramic, porcelain, majolica), or an era (vintage, mid-century, modern)
- Variety in size — a mix of dinner plates, salad plates, and smaller accent pieces creates natural rhythm and movement
- Variety in shape — round plates are classic, but oval, scalloped, and square plates add surprise and dimension
- Depth of character — hand-painted details, interesting glazes, raised textures, or a meaningful provenance (grandma’s china, a flea market find, a souvenir from travel) give a display its soul
Don’t worry about matching perfectly. The goal is a curated collection, not a coordinated set.
Pick the Right Hanging Hardware
This is the step where most people get nervous — and understandably so. Hanging plates feels permanent and risky. But with the right tools, it’s far more forgiving than you’d expect.
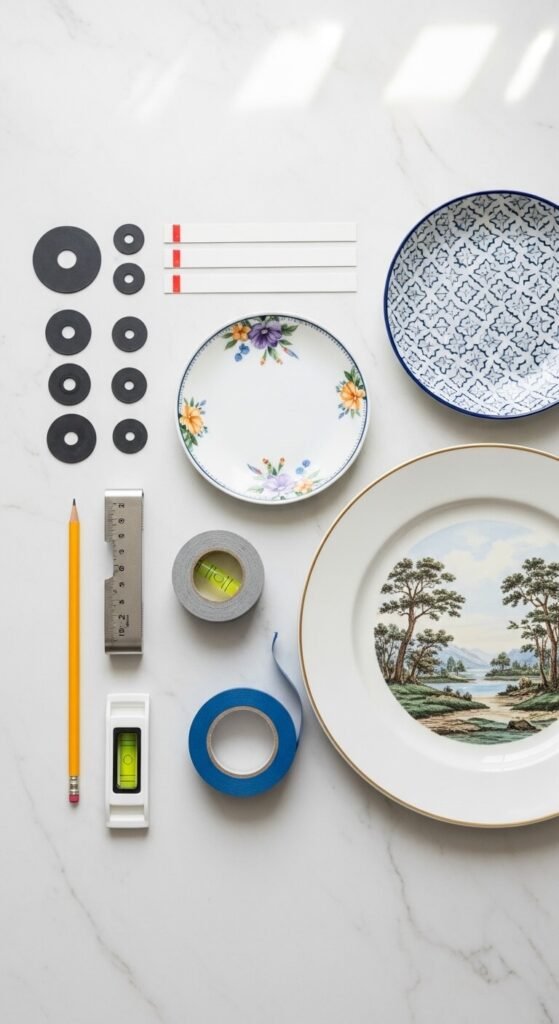
Your two main options:
Plate hangers (spring wire or disc hangers)
- Spring wire hangers wrap around the edge of the plate and clip to a wall hook — great for heavier or more valuable pieces
- Adhesive disc hangers stick directly to the back of the plate and hang from a small nail — clean, nearly invisible, and ideal for most decorative plates
- Always check the weight rating and match it to your plate’s size and material
Adhesive strips
- Command-style strips work well for lighter plates on smooth walls
- Best for temporary displays or renters who can’t put holes in walls
- Check the weight limit carefully — ceramic plates are heavier than they look
Pro tips:
- Use a small level to avoid the maddening discovery that everything is slightly tilted
- Painter’s tape on the wall while planning saves you from excess nail holes
- For large or irreplaceable plates, always use a stud finder and anchor into the wall properly
Plan Your Layout Before You Commit
The biggest mistake people make with plate walls? Going straight to the hammer. Planning your arrangement on paper — or better yet, on the floor — before a single nail goes in will save you a lot of patched holes and frustration.
Try this simple approach:
- Trace each plate onto kraft paper or newspaper and cut out the shapes
- Arrange the paper cutouts on the floor until you love the layout
- Tape them to the wall with painter’s tape to preview the arrangement at scale
- Step back and assess — look at it from across the room, not just up close
- Mark your nail points through the paper, then remove the templates and hang
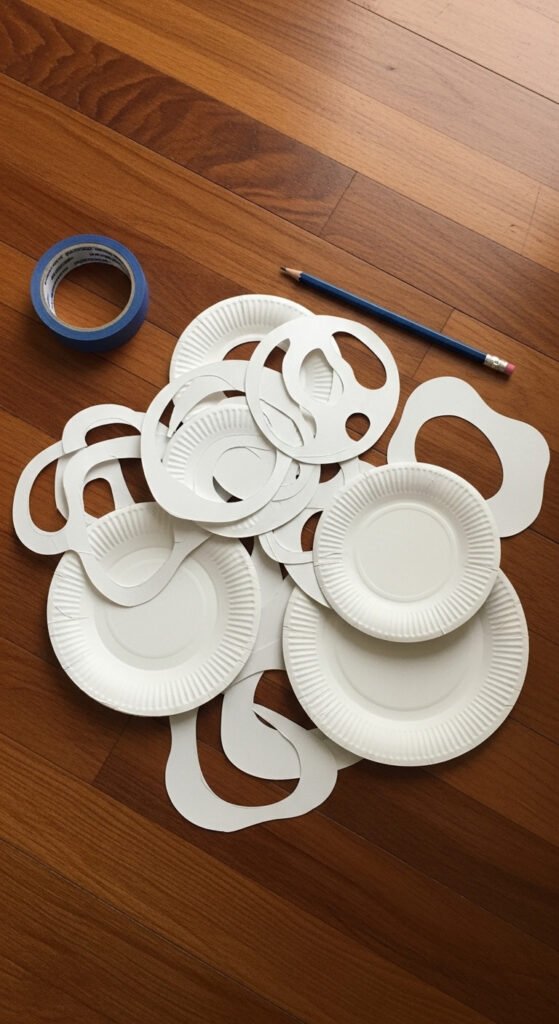
When composing your arrangement, start with your largest plate as the anchor point — usually the center — and build outward. Aim for even spacing between pieces (about 2–3 inches works well for most displays).
Choose an Arrangement Style That Fits Your Space
There’s no single right way to arrange a plate wall — but there are a few tried-and-true approaches that consistently look beautiful.
- Symmetrical grid — plates in uniform rows and columns for a clean, formal, gallery-wall feel. Works beautifully in dining rooms and hallways.
- Organic cluster — an asymmetrical grouping that radiates outward from a central piece. Feels relaxed, collected, and full of personality. Perfect for living rooms and kitchens.
- Linear row — a single horizontal or vertical line of plates. Ideal for narrow walls, above a sofa, or along a staircase.
- Stacked salon style — a densely layered arrangement that fills the entire wall. Bold, maximalist, and absolutely stunning when done well.
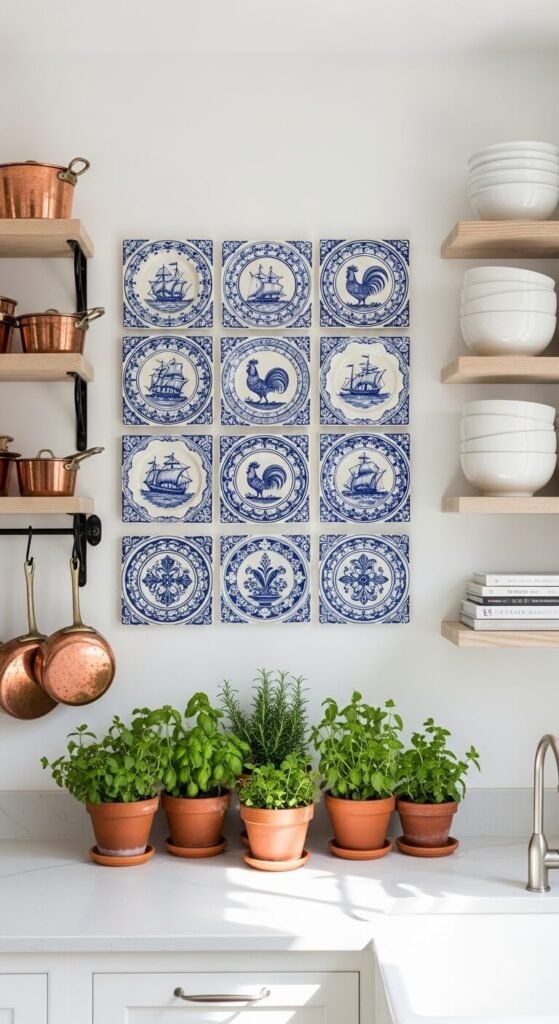
Whatever arrangement you choose, odd numbers tend to feel more natural and dynamic than even ones — three, five, seven, or nine plates almost always look better than two, four, or six.
Style the Space Around Your Display
A plate wall doesn’t exist in isolation — what surrounds it matters just as much as the display itself. Anchor your arrangement with complementary furniture and accessories to make the whole vignette feel intentional.
Some ideas that work beautifully:
- A console table, sideboard, or bench positioned below the display
- A table lamp or two for warm, ambient light that illuminates the plates from below
- Fresh or dried botanicals — a vase of stems, a trailing plant, or a bowl of seasonal fruit
- Books, candles, or small objects that echo the colors in your plates
- A single large mirror or framed print nearby to balance the composition
The Takeaway
A plate wall is one of the most personal, affordable, and genuinely stunning things you can do for a room. It tells a story — of travels taken, markets visited, family heirlooms kept — in a way that a store-bought print simply can’t.
Save this article before your next flea market run or estate sale scroll — because once you start seeing plates as wall art, you’ll never look at a thrift store shelf the same way again. 🍽️✨